First, I found a few images online and did some quick "research sketches." These were intended to be quite loose, simply capturing gesture, clothing and style...

 After doing a few sketches, I decided to give my gang member baggy "saggin' style" jeans with visible boxers, a "wife beater" style sleeveless t-shirt, a do-rag and tennis shoes. For a weapon, in lieu of a bladed weapon or gun, I opted for a good ol' fashioned baseball bat. I then drew a quick turnaround to assist in my modeling effort. Initially, I created a complete "nude" body and modeled the clothing and accesories separately. This initial mesh was a very respectable 1,187 polys (with clothing and accessories bringing the total up to 1,906 polys).
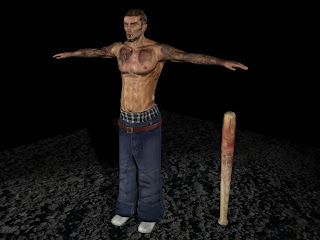
 After UV unwrapping all of the pieces, I then composited all of the textures for them using Photoshop. As can be seen, I opted for numerous tattoos and a very stylish pair of plaid boxers.
 Hey, this fellow color coordinates with a nice blue bandana ...accents his eyes, don't you think? Um, wait, does that make him a "Crip?"
 I also decided to add a bloody texture to the baseball bat, so the viewing public wouldn't mistake this fellow for an MLB team member. Nonetheless, his RBI isn't bad...
 Hey, look everybody, it's Robert Van Winkle! ...and no, Vanilla Ice was not my original inspiration.
 I then went back and tweaked the mesh out quite a bit, which caused the geometry to jump up to 3,821 polys. Being less than 5,000 polys, this is still considered to be a low-poly model and appropriate for gaming.
 I then UV unwrapped my new mesh objects and imported them as .obj objects into Zbrush for some digital sculpture work. After sculpting all of the desired details, I exported a Normal Map from Zbrush and applied it to my low poly model within Maya. I also recreated all of my textures, matching them to my Normal Map. The resultant model appears to have quite a bit more geometric detail than the original model, but it's still only 3,821 polys.


No comments:
Post a Comment