Friday, November 21, 2008

Next foray into the magical world of Animation

Now, I am by no means an animator. My first plunge into the wonderful world of Animation was mixed at best: my bouncing ball was pretty nifty, my racing car was mediocre but my character walk cycle was absolutely dreadful (...and you seriously don't want to ask me about my character's dance. Seriously.) So, it is with obvious trepedation that I return, as the Prodigal Son, to this uncertain realm. I am happy to say, however, that, so far, it's been fairly successful. I credit part of that to the wonderful instruction by Mr. Paul Orlando, a teacher infamous for being brooding, confrontational (dare I say, Snape-like?) and just a bit altogether wacky. Anyway, I've included several simple playblast (i.e., non-rendered) animations for your viewing pleasure.

So, my first task was to create a default "happy" walk cycle using the Andy Rig v1.4.6 created by John Doublestein. It's a pretty good model, rigged nicely, including the option to change the gender with a couple of different clothing options. The cycle is only a couple of steps, so you may need to play it repeatedly.

After creating a "happy" walk cycle, I decided to do its polar opposite: the "sad" walk cycle. Again, it's fairly short, so you may need to play it a few times. Basically, this was just an exercise to get used to the rig, creating a mechanical action in which the whole body of the character looks like it's involved in the motion. Also, I experimented with timing, spacing and pose to evoke an emotion.

Next, I moved on to the "Basic Guy" Rig v.1.0 created by Tim Oberlander. This rig is actually a bit more advanced and easy to use than the Andy Rig, but (obviously) Basic Guy has no mouth, so facial animation is a bit limited. First, I created a simple spin jump, just to get used to the rig and continue my exploration of character mechanics.

Then, I added a prop--in this case, a golf club--and created a small story in which Basic Guy (hopefully) emotes a whole range of emotions. So, like I said, things are going fairly well in my sophomore attempt at animation, but I still have a lot to learn as animation presents is own obstacles and challenges.

What's that you say? You say you're still curious about my "dance." I warned you! I warned you NOT to ask me about that!!! Okay, okay, if you MUST see... but be AFRAID, be very AFRAID!

I WARNED YOU!!!

Persian Fort project

Whoa, another insanely huge post!!! Anyway, this is another Unreal mod project in which I was involved set in medieval Persia. I was basically responsible for most of the level design concepts, all concept art/level diagrams as well as building and texturing most of the assets in the level. I was not involved in the creation of the BSP, assembly of the level or any scripting. My initial isometric sketches served as a kind of miniature template for what would become the final level, and helped me to create the master asset list. The initial idea was to design a single player mission in which the player would descend throughout the level to a lower dungeon, eventually rescuing a comrade being held captive. The time constraints proved to be too difficult to finish all of the scripting required. However, Mike Reed was able to finish a good "guard mode" A.I. which deviates from default deathmatch A.I. that the bots usually use. He was also able to script some nice triggers, such as: the ability to shoot down torches and lights, proximity-based sounds and the ability to shoot objects off tables. Cameron Barnes created the BSP and assembled the level.


Here are just a few of the assets that I created for the level, starting with a nice palm tree...

Here's a fruit stand, which was also used in the Courtyard.

I created this simple archery target for the Training Area.

...and, for the Barracks, I created this simple bed and chest (i.e., used a Persian rug for the blanket).

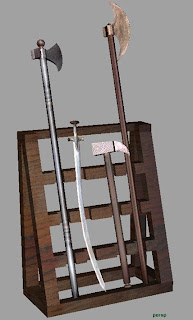
I also created this weapons rack for the Training Area, complete with authentic Persian weaponry.

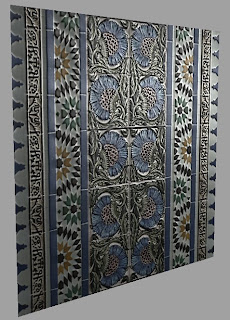
For the Main Hall, I created this fountain with an elaborate Persian mosaic texture.

Also for the Main Hall, I created this wall piece (with texture and normal map)...

...this ceiling piece (with texture and normal map)...

...and this floor piece (with texture map, normal map and specular map). Note: the Persian rug does not reflect the light as does the tile.

I also had the grand idea of retexturing one of the Unreal 3 models, to make it fit with our medieval theme. By the way, I know, I know, the Persians didn't wear full plate male as did the Europeans, but what do you expect?!? I got a model of a guy wearing friggin' Gears of War power armor and he looks like he's right out of Warhammer 40K! I don't think I could pull off transforming that into leather or chainmail with textures alone!

Ahem, sorry about that. Anyway, the sad truth is, after I worked so hard re-texturing this default Unreal 3 model, I was unable to re-import it into the game. Oh well, it was a good texturing exercise. (Did I mention that I did NOT create this model? It is one of the default male models that ships with Unreal 3--I just re-textured it)


Here's a screenshot of the Courtyard.

This is the entrance to the Persian fort (the torches can be shot down)

This is the dining hall portion of the Barracks. After starting the project, we each decided to assume responsibility for one room; Mike Reed selected the Barracks. He wrote script so the light can be shot down to darken the room (to stealthily sneak by guards). In addition, the plates and cups can be shot off the tables.

I assumed responsibility for the Main Hall. I really wanted to capture the dizzying clash of textures that I found in much of my Persian reference imagery. I wanted to make a strong impact on the player as soon as they enter the front door. Also, the patterns could act as a sort of camouflage, enhancing the difficulty as the players battle the guards.

Although I could have matched the blue within the wall tiles to the blue within the columns and floor better, I'm fairly happy with the overall effect I achieved within the room (i.e., complete gaudiness).

Thursday, November 20, 2008

Cleanup On Aisle Six project

WOW, HUGE POST!!! Okay, so this is my first foray into the world of Unreal. Some friends and I decided to do a zombie-based level set in a small rural supermarket. The basic premise is the player's character has been surviving a zombie onslaught in a small town. When his supplies ran low, however, he needed to stop by the local grocery store for some rations in the form of canned goods. While checking off the items on his grocery list, a van tore across the parking lot into a tanker truck; which subsequently exploded, cutting off the character's only escape route. I was responsible for most of the level design elements, environmental art, as well as the creation, texturing and assembly of the BSP map within Unreal. We created almost all of the static meshes placed within the level, only borrowing the RealTree and car meshes that shipped with Unreal. Michael Horton created and textured the vast majority of these custom static meshes. Vincent Walker created some of the more involved (and higher poly) meshes, such as the zombie character and the tanker truck. Octavia Jones rigged and animated the zombie character and assisted with particle effects.

My initial quick sketch of the parking lot and exterior of the store ended up being a fairly accurate depiction of the final level...

Originally, the player was going to fight Big Earl, himself, the former proprietor of this fine establishment, in a "boss"-like zombie battle.

However, we eventually decided to have the player battle hordes of redneck zombies, wearing their signature rebel flag "wife beaters" and tight jeans tucked into their cowboy boots. The zombie character was beautifully modelled by Vincent Walker and lovingly animated by Octavia, but, due to time constraints, we were unable to fully import it into the level. Such a shame...

Here's a nice exterior view of the Earl's Grocery Food and Drug Mart...

...and another view from the other side of the parking lot.

Here's a view of the van/tanker truck collision, with nice particle-based fire and smoke effects.

This is the main entrance to the store...

...with the shopping cart return area. Notice the pig logo has a big chunk missing from his body as he gestures toward a floating ham hock above him. I swear, sometimes Michael worries me...

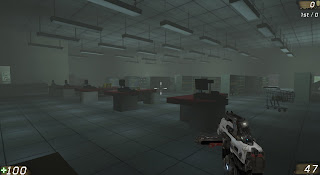
This is a nice view of the dim, atmospheric interior of the store. A light behind the distant pharmacy counter indicates where the player might pick up some additional health.

Here's one of the many trashed aisles in Earl's Grocery (hence the title). Zombies really don't know a thing about picking up after themselves, do they?

This is another view of the small, obsolete registers used in the store. Note: the yellow boxes are "Bushidos" cereal, which is obviously Michael's doing.

The areas that received the least amount of attention were the bathrooms...

...and the loading dock area, which are both rather boring and plain. However, due to time constraints, sacrifices had to be made.

Overall, it was a great learning experience (and a level that has a lot of potential).

Sacrifice project

Well, I've been working on some environmental concept art for an Unreal mod called "Sacrifice." The overall concept, as well as the Game Design Doc (which includes the story, characters, level diagram, art asset list, level/puzzle descriptions, scripts, art references, et al.) were created by Daniel Cazan. In a nutshell, the story is this: a Death-worshipping alien race descended on a remote Eastern European monastery built on powerful lay-lines, setting a trap that will open a gateway to the realm of Death itself. This trap involved building a mysterious black dome around the monastery, with internal walls dividing the structure into three "pie wedge" sections; individual entrances lead into each of the three sections. Eventually, the dome-shrouded structure was discovered by local hikers and the military was called in to investigate. The military sends teams into each of three entrances, which simultaneously shut, trapping each of the teams inside. The player's character is the leader of (Green) Squad 1.

As in Gears of War (i.e., the Kryll), the player will discover that being surrounded by darkness is a bad thing. One example is the sunken Library of the monastery. The stairs on either side of the room lead only to darkness and death; only by jumping across the tops of the bookcases (and, thus, remaining in the hazy glow of the alien lights) will the player be able to traverse the room.

The first image that the player will see is the--hopefully--awe-inspiring view of the monastery facade surrounded by the alien dome. The pale, artificial light has caused the foliage to wither and many of the structures are crumbling from neglect. Creepy alien devices cover parts of the building in an aesthetic that is Star Trek's Borg crossed with the mechanisms in Event Horizon (e.g., "heavy metallic, spikey, alien look").

Both of these images basically started as pencil drawings which I scanned and colored using Photoshop. I'm still getting my feet wet regarding the use of color, but I'm fairly pleased with how these images turned out.

Some old doodles...

Okay, in an attempt to be somewhat discriminating about what I post out here, I've gone back to my old tricks of not posting anything new in ages. So, to whet your appetite until my next big post--which should be in the next day or two, honest!--I've provided a few sketches I've accumulated since my last entry. My next couple of posts will cover my first couple of Unreal levels as well as some early attempts at animation.

Demon Concept

Demon Concept (details)

Alien Concept
Steampunk Character #1
Steampunk Character #2
Electric Eel Creature

Wednesday, August 27, 2008

The mighty Greek Trireme!

In continuing my exploration of the world of 3D Studio Max, I decided to delve back into the depths of NURBs modelling as well. Instead of manipulating polygonal objects (i.e., objects with polygon faces composed of vertices connected via straight line edges), I would be using NURBS (Non-Uniform Rational Basic Splines) objects. These are basically objects that are constructed through mathematical curves, like Bezier splines, instead of flat-faced polygons. Recalling an Egyptian galley that I modelled using NURBS geometry in my early foray into Maya modelling, I decided to model a Greek Trireme in 3DS Max!

What resulted is perhaps the most complicated model I've ever created to date. As with the original ship, there are 170 oars divided into three rows (hence the "Tri" in "Trireme") on each side of the ship. Of course, there are also 170 corresponding seats, portal holes, seat braces, et al. as well as a seemingly endless array of internal scaffolding. Using a large variety of source imagery (as well as written research), I attempted to model the ship as historically accurate as possible. I'm happy with the amount of detail that I was able to capture within the moderately high 30,544 polygon range. I credit the low poly number with 3DS Max's spline/surface system, whereby I have complete control of the creation of my mesh through various spline controls.

Here's a nice view of the starboard side. In particular the oars and bronze ram can be seen.

Here's a shot of the bow with another view of the ram. Rams were used to cut large gashes in the hulls of enemy ships as well as snap the oars along one side, effectively disabling them. The three rows of oars can also be seen in this view.
Here's a view of the port side, revealing the rigging behind the dual masts, the steering rudders and the captain's chair.
Here's a view of the stern/aft, revealing a close up of the stylized "fish tail" forming the rear of the craft. This same basic form was also used in the Egyptian galley.

Here's an interior view in which the seats of the top two rowers (i.e., Eretai) can be seen: 31 Thranitai sit along the outer edge of each side and 27 Zygitai sit staggered below them on each side for a total of 116 Eretai on this upper level of the ship. The Thranitai are named after "Thranos," the Greek word for "Deck," and refers to the Parexeiresia railing which hangs over the outer edge of the ship through which the Thranitai's oars are mounted. The Zygitai, on the other hand, are named after "Zygoi," the Greek word for the crossbeams on which their seats are mounted.
Here's a view of the bottom Hold (i.e., Thalamos) of the ship. Here, 27 Thalamitai sit staggered below their brethren on either side of the ship in this least desirable of places. Being on the bottom means that the Thalamitai are both targets for anything falling (or dripping) from the upper deck as well as potential victims of flooding because they are so close to the water line.

Friday, August 15, 2008

Ode to Venger

Allow me, if you will, a moment to become lost in the fond memories of my youth and pay humble tribute to a favorite villain of mine. If you, like me, were a child of the '80's... feasting on the veritable smorgasbord of truly kick ass cartoons available (G.I. Joe, Transformers, He-Man, Super Friends, The Real Ghostbusters, Muppet Babies--Yeah, I said it! It rocked!--Voltron, Thundercats, M.A.S.K., Silverhawks...the list is endless), then you might remember a little show called Dungeons & Dragons. It was condemned by critics as being too violent and protested by Christian fanatics as being "demonic!"... which means it kicked ass! Now, without further ado...

Venger, o Venger... how I truly miss thee, and yet, how I feared thee as a child.
Not so much for the evil acts you committed, but due to that big, friggin' horn coming out of the side of your head.
Somehow an asymmetrical horn makes you far more intimidating than Tim Curry's Lord of Darkness in Legend.
(2 horns = predictable, 1 horn = loose cannon)

Venger, o Venger... your light gray skin and eyeliner make you the very first "goth."
With your glowing red eyes, vampire-ish fangs and tiny, almost nonexistent (dare I say Michael Jackson-esque?) nose.
And how your strange headpiece always freaked me out...
Does your head actually extend all the way to the back (i.e., Alien-style), or is it just like a long hat?

Venger, o Venger... with your little red armor and your little black, um, shawl...
No one would ever make fun of that gray pleated skirt (due, primarily, to the aforementioned horn).

You would wrap those great leathery wings about you like a warm (albeit slimy) coat...
And you always managed to fly without flapping them, supporting not only your own weight, but your horse's as well!

Venger, o Venger... speaking of horses, you had the best steed in the whole world...
Way cooler than that "Equort" Ookla the Mok rode in Thundarr the Barbarian.
The Nazgûl only wished they had a horse that cool!
But I still can't figure out how you managed to keep that horse aloft by gliding with your bat wings.

Venger, o Venger... all you ever wanted was those li'l bastards' weapons.
How I would secretly root for you when it involved the maiming/death of that annoying Uni ("Maaah! Maaah!!!")
And you get extra cool points for having the same voice as Optimus Prime.
Everyone thought you simply wanted to defeat Tiamat, but, alas, you just wanted a big 'ol hug from Dungeonmaster.


Wednesday, August 6, 2008

WWII Half-Track in 3DS Max

In addition to learning Maya as a 3D modeling/animation tool, I figured it would behoove me to learn 3D Studio Max as well. For my first project I modelled an M3A2 Half-Track Armored Personnel Carrier, a sturdy--yet mobile--means of transport for infantry and equipment as well as reconnaissance in World War II. Basically, the body of an M3 Scout Car was fitted with the rear bogie assembly of a T9 Half-Track Truck with a "pulpit mounted" .50 caliber machine gun attached to the top. A .30 caliber machine gun was mounted to the side with another being mounted at the rear. The armor included an adjustable armored shutter for the engine's radiator as well as a folding bulletproof windscreen. In addition, a bumper-mounted roller assembly assisted with negotiating rocky, uneven terrain. Mine racks lined either side of the vehicle and two large equipment racks were attached to the rear.

The model has not been UV unwrapped and textured--only colored using simple shaders. While it is certainly not a low poly model for games (i.e., 15,179 quads), it is not a high poly model as typically used in animation; let's just call it an intermediate poly model which could possibly be used for cutscenes in a game. By the way, I have to say that learning 3DS Max was way more frustrating than I expected. I thought, "Hey, I know how to model in 3D... just need to learn where all the buttons are in Max, right?" WRONG!!! In addition to having a completely different naming convention for everything, in many cases, Max has a completely different approach to various functions. It's like trying to draw with your other hand... you already know how to draw, but you just can't... can't... make it look right?

"Dammit, how do you 'Center Pivot' again?!"

"I just want Maya's 'Split Polygon Tool,' and NOT that accursed 'Slice Plane'... whaddya mean use 'Cut?!'

"Wait a minute, so 'Attach' is like Maya's 'Combine' and 'Detach' is like Maya's 'Separate?'"

"Where' is my 'Attributes Editor?'.... absorbed into the 'Material Editor?!?' ARGH!!!"

"THE Z AXIS IS FRIGGIN' POINTING UP?!?!"

etc., etc., etc.


There's actually still some more detail that I would like to add here, including the small shutters for the bulletproof screens, the hood fasteners, the two side-mounted ladders, the two side-mounted gas canisters, the two side-mounted shovels, as well as rivets galore!

Regarding the rear of the model, there's a rear access door that I should probably model as well as some additional detail on the bumper. The guns and mounts also need quite a bit of work.

I'm fairly happy with the overall silhouette and direction the model is heading. I just need to add in those extra details.

The inside of the truck probably needs the most attention. The seats, floor and "pulpit mount" are all a bit lacking! Hopefully, I'll finish 'er up soon!